Saturday, March 27, 2010

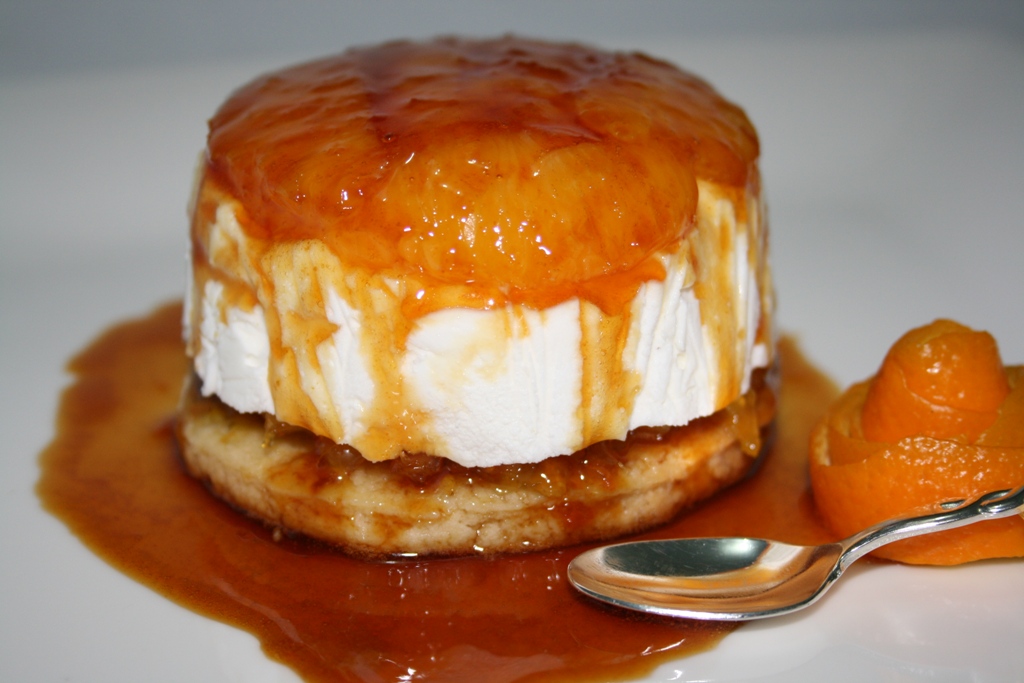
Orange Tian


The 2010 March Daring Baker’s challenge was hosted by Jennifer of Chocolate Shavings. She chose Orange Tian as the challenge for this month, a dessert based on a recipe from Alain Ducasse’s Cooking School in Paris.

Even in my wildest dreams I would not ever think of doing an Orange Tian...so I have to thank Daring Bakers for giving me the opportunity. It was such a hit with my family and friends; and of course with me too. I liked the Orange Marmalade the best and my hubs was surprized to find me having toasted bread with a big blob of 'Marmalade'; something which I always avoid.

I made about 6 miniature versions; and two of them went to a friend of hubs; who called me specially to say WOW; Thumbs Up ! Send more ;).

Thanks to Daring Bakers, I have ventured into doing things which I would never have attempted. Thanks again DB.

The recipe for the Orange Tian follows for those interested.

There are quite a few steps to making this dessert; however a lot of them can be made in advance. The orange marmalade can be made several days ahead of time and the caramel sauce and orange segments preparation should be made the day before you make the dessert. Also, if you have a scale, try and use the weighed measurements as they will be the most accurate.
The recipe can be a little bit tricky to put together, especially the first time. My main tip is to make sure the whipped cream is firm enough when you make it and be sure to leave the desserts to set in the freezer for long enough or they will fall apart when you unmold them.
Variations allowed:• You can choose to serve the dessert ‘family-style’ and don’t have to make it in individual portions• You can use your favorite “Pate Sablee” recipe if you have one, but it must be a pate sablee• You can add any additional flavoring to your whipped cream• You can play with different citrus in this dessert (grapefruit, blood orange, lemon) at any step in the recipe.However, you must make the tart dough, the whipped cream, the caramel sauce, citrus segments and marmalade.
Preparation time:- Pate Sablee: 20 minutes to make, 30 minutes to rest, 15 minutes to roll out, 20 minutes to bake- Marmalade: 20 minutes to make, 30 minutes to blanch- Orange segments: 20 minutes, overnight to sit- Caramel: 15 minutes, overnight to sit- Whipped Cream: 15 minutes- Assembling: 20 minutes- Freezer to Set: 10 minutes
Equipment required:• Cookie cutters . Ideally, you should have about 6 cookie cutters to build the desserts in and cut the circles of dough (see photo). The cookie cutters will be the size of your final dessert, so they should be the size of an individually-sized tart mold. If you don’t have round cookie cutters you could use an individually-sized cheesecake mold without its base.• A food processor (although the dough could be made by hand too)• A stand-up or hand mixer• Parchment paper or a silicone sheet• A baking sheet• A rolling pin
For the Pate Sablee:
Ingredients U.S. Imperial Metric Instructions for Ingredients2 medium-sized egg yolks at room temperaturegranulated sugar 6 tablespoons + 1 teaspoon; 2.8 oz; 80 gramsvanilla extract ½ teaspoonUnsalted butter ¼ cup + 3 tablespoons; 3.5 oz; 100 grams ice cold, cubedSalt 1/3 teaspoon; 2 gramsAll-purpose flour 1.5 cup + 2 tablespoons; 7 oz; 200 gramsbaking powder 1 teaspoon ; 4 grams
Directions:Put the flour, baking powder, ice cold cubed butter and salt in a food processor fitted with a steel blade.
In a separate bowl, add the eggs yolks, vanilla extract and sugar and beat with a whisk until the mixture is pale. Pour the egg mixture in the food processor.
Process until the dough just comes together. If you find that the dough is still a little too crumbly to come together, add a couple drops of water and process again to form a homogenous ball of dough. Form into a disc, cover with plastic wrap and leave to rest in the fridge for 30 minutes.Preheat your oven to 350 degree Fahrenheit.
Roll out the dough onto a lightly floured surface until you obtain a ¼ inch thick circle.
Using your cookie cutter, cut out circles of dough and place on a parchment (or silicone) lined baking sheet. Bake for 20 minutes or until the circles of dough are just golden.
For the Marmalade:
Ingredients U.S. Imperial Metric Instructions for IngredientsFreshly pressed orange juice ¼ cup + 3 tablespoons; 3.5 oz; 100 grams1 large orange used to make orange slicescold water to cook the orange slicespectin 5 gramsgranulated sugar: use the same weight as the weight of orange slices once they are cooked
Finely slice the orange. Place the orange slices in a medium-sized pot filled with cold water. Simmer for about 10 minutes, discard the water, re-fill with cold water and blanch the oranges for another 10 minutes.
Blanch the orange slices 3 times. This process removes the bitterness from the orange peel, so it is essential to use a new batch of cold water every time when you blanch the slices.
Once blanched 3 times, drain the slices and let them cool.
Once they are cool enough to handle, finely mince them (using a knife or a food processor).
Weigh the slices and use the same amount of granulated sugar . If you don’t have a scale, you can place the slices in a cup measurer and use the same amount of sugar.
In a pot over medium heat, add the minced orange slices, the sugar you just weighed, the orange juice and the pectin. Cook until the mixture reaches a jam consistency (10-15 minutes).
Transfer to a bowl, cover with plastic wrap and put in the fridge.
For the Orange Segments:
For this step you will need 8 oranges.
Cut the oranges into segments over a shallow bowl and make sure to keep the juice. Add the segments to the bowl with the juice.
[See YouTube video in the References section below for additional information on segmenting oranges.]
For the Caramel:
Ingredients U.S. Metric Imperial Instructions for Ingredientsgranulated sugar 1 cup; 7 oz; 200 gramsorange juice 1.5 cups + 2 tablespoons; 14 oz; 400 grams
Place the sugar in a pan on medium heat and begin heating it.
Once the sugar starts to bubble and foam, slowly add the orange juice. As soon as the mixture starts boiling, remove from the heat and pour half of the mixture over the orange segments.
Reserve the other half of the caramel mixture in a small bowl — you will use this later to spoon over the finished dessert. When the dessert is assembled and setting in the freezer, heat the kept caramel sauce in a small saucepan over low heat until it thickens and just coats the back of a spoon (about 10 minutes). You can then spoon it over the orange tians.
For the Whipped Cream:
Ingredients U.S. Metric Imperial Instructions for Ingredientsheavy whipping cream 1 cup; 7 oz; 200 grams3 tablespoons of hot water1 tsp Gelatine1 tablespoon of confectioner's sugarorange marmalade (see recipe above) 1 tablespoon
In a small bowl, add the gelatine and hot water, stirring well until the gelatine dissolves. Let the gelatine cool to room temperature while you make the whipped cream. Combine the cream in a chilled mixing bowl. Whip the cream using a hand mixer on low speed until the cream starts to thicken for about one minute. Add the confectioner sugar. Increase the speed to medium-high. Whip the cream until the beaters leave visible (but not lasting) trails in the cream, then add the cooled gelatine slowly while beating continuously. Continue whipping until the cream is light and fluffy and forms soft peaks. Transfer the whipped cream to a bowl and fold in the orange marmalade.[Tip: Use an ice cold bowl to make the whipped cream in. You can do this by putting your mixing bowl, cream and beater in the fridge for 20 minutes prior to whipping the cream.]
Assembling the Dessert:
Make sure you have some room in your freezer. Ideally, you should be able to fit a small baking sheet or tray of desserts to set in the freezer.
Line a small tray or baking sheet with parchment paper or a silicone sheet. Lay out 6 cookie cutters onto the parchment paper/silicone.
Drain the orange segments on a kitchen towel.
Have the marmalade, whipped cream and baked circles of dough ready to use.
Arrange the orange segments at the bottom of each cookie cutter. Make sure the segments all touch either and that there are no gaps. Make sure they fit snuggly and look pretty as they will end up being the top of the dessert. Arrange them as you would sliced apples when making an apple tart.
Once you have neatly arranged one layer of orange segments at the bottom of each cookie cutter, add a couple spoonfuls of whipped cream and gently spread it so that it fills the cookie cutter in an even layer. Leave about 1/4 inch at the top so there is room for dough circle.
Using a butter knife or small spoon, spread a small even layer of orange marmalade on each circle of dough.
Carefully place a circle of dough over each ring (the side of dough covered in marmalade should be the side touching the whipping cream). Gently press on the circle of dough to make sure the dessert is compact.
Place the desserts to set in the freezer to set for 10 minutes.
Using a small knife, gently go around the edges of the cookie cutter to make sure the dessert will be easy to unmold. Gently place your serving plate on top of a dessert (on top of the circle of dough) and turn the plate over. Gently remove the cookie cutter, add a spoonful of caramel sauce and serve immediately.

Saturday, February 27, 2010

Tiramisu - A Divine Italian Dessert


The February 2010 Daring Bakers’ challenge was hosted by Aparna of My Diverse Kitchen and Deeba of Passionate About Baking. They chose Tiramisu as the challenge for the month. Their challenge recipe is based on recipes from The Washington Post, Cordon Bleu at Home and Baking Obsession.

This divine Italian dessert translates to mean ‘pick me up’, supposedly referring to the ‘kick’ provided by the strong coffee, sugar and alcohol in it!On the other hand, a slight mistake in spelling it as "Tiramuso" could end up meaning that you were "pulling a sulky face"! Classic tiramisu is made of alternate layers of espresso soaked ladyfinger biscuits and a cream made from mascarpone cheese and zabaglione (an egg custard).

The perfect Tiramisu is a balance of flavors of a sweet zabaglione, strong coffee, marsala wine, creamy mascarpone cheese and the dusting of unsweetened cocoa.

So when, where and how was tiramisu born?

Tiramisu is said to have its origins in Treviso (Italy), and there are quite a few stories about how it came to be created.One story traces the tiramisu as far back as the Renaissance claiming that it was first made in honour of the visit of Grand Duke Cosimo di Medici to Tuscany. Yet another one points to the tiramisu being an adaptation of the "Zuppa Inglese" referring to the sponge cake and cream layered English Trifle.
However, experts in this area generally agree that the tiramisu as we know it today, was born in the ‘70s.Some believe that the Tiramisu was created in the the Le Beccherie (a restaurant in Treviso). Ohters suggest that Tiramisu was first made in 1971 by an Italian baker named Carminantonio Iannaccone in a small bakery in Treviso, Italy.

VARIATIONS:

Tiramisu is usually made in square dishes and cut into squares to serve. If you want to be different, please feel free to give full rein to your creativity as to how you want to present, decorate and serve your tiramisu. Make it square, round, as individual servings, or whatever! However, your version of Tiramisu must contain the mascarpone cheese and the savoiardi/ ladyfinger biscuits you made.

PREPARATION TIME:

Tiramisu is made up of several components which can be made separately and ahead of time and put together the day before serving.Making tiramisu from scratch requires about 2 to 3 days (including refrigeration) from when you start making the mascarpone to the time the tiramisu is served. So this challenge requires some prior planning.
Please read the instructions as you need to begin making the mascarpone at least a day in advance.The zabaglione & pastry cream also need 4 hours to an overnight for chilling, as does the main dessert. The flavours mature after an overnight rest, and the dessert can be kept refrigerated for 2-3 days.Once assembled, the tiramisu can be frozen till you need to serve it, in case you are not serving it immediately.


EQUIPMENT REQUIRED:

A double boiler (a stainless steel bowl that fits inside a large saucepan/ pot without touching the bottom will do)
Two or three large mixing bowls
Whisk
A medium sized heavy bottomed pan
Fine meshed strainer (to remove lumps from pastry cream, if any)
Electric mixer, hand held
Serving dish (or dishes) of choice (8" by 8" should be fine)
Spatula for folding and spoons as required
Plastic wrap/ clingfilm
Baking sheets
Parchment paper or nonstick liners
Pastry bag (can be disposable)
Plain 3/4" pastry bag tip or cut the end of pastry bag to this size (If you don’t have a pastry bag and/or tips, you can use a Ziploc bag with the corner snipped off)
Oven
Cooling rack
Thin-bladed spatula for removing ladyfinger biscuits from the baking sheets
Instant-read thermometer (optional)
Strainer
Cheesecloth or cotton napkin for draining mascarpone
Fine-mesh strainer for shaking cocoa powder on tiramisu

TIRAMISU

(Recipe source: Carminantonio's Tiramisu from The Washington Post, July 11 2007 )This recipe makes 6 servings
Ingredients:For the zabaglione:2 large egg yolks3 tablespoons sugar/50gms1/4 cup/60ml Marsala wine (or port or coffee)1/4 teaspoon/ 1.25ml vanilla extract1/2 teaspoon finely grated lemon zest
For the vanilla pastry cream:1/4 cup/55gms sugar1 tablespoon/8gms all purpose flour1/2 teaspoon finely grated lemon zest1/2 teaspoon/ 2.5ml vanilla extract1 large egg yolk3/4 cup/175ml whole milk

For the whipped cream:
1 cup/235ml chilled heavy cream (we used 25%)1/4 cup/55gms sugar1/2 teaspoon/ 2.5ml vanilla extract
To assemble the tiramisu:2 cups/470ml brewed espresso, warmed1 teaspoon/5ml rum extract (optional)1/2 cup/110gms sugar1/3 cup/75gms mascarpone cheese36 savoiardi/ ladyfinger biscuits (you may use less)2 tablespoons/30gms unsweetened cocoa powder

Method:
For the zabaglione:
Heat water in a double boiler. If you don’t have a double boiler, place a pot with about an inch of water in it on the stove. Place a heat-proof bowl in the pot making sure the bottom does not touch the water.In a large mixing bowl (or stainless steel mixing bowl), mix together the egg yolks, sugar, the Marsala (or espresso/ coffee), vanilla extract and lemon zest. Whisk together until the yolks are fully blended and the mixture looks smooth.
Transfer the mixture to the top of a double boiler or place your bowl over the pan/ pot with simmering water. Cook the egg mixture over low heat, stirring constantly, for about 8 minutes or until it resembles thick custard. It may bubble a bit as it reaches that consistency.Let cool to room temperature and transfer the zabaglione to a bowl. Cover and refrigerate at least 4 hours or overnight, until thoroughly chilled.

For the pastry cream:
Mix together the sugar, flour, lemon zest and vanilla extract in a medium heavy-bottomed saucepan. To this add the egg yolk and half the milk. Whisk until smooth.Now place the saucepan over low heat and cook, stirring constantly to prevent the mixture from curdling.Add the remaining milk a little at a time, still stirring constantly. After about 12 minutes the mixture will be thick, free of lumps and beginning to bubble. (If you have a few lumps, don’t worry. You can push the cream through a fine-mesh strainer.)Transfer the pastry cream to a bowl and cool to room temperature. Cover with plastic film and refrigerate at least 4 hours or overnight, until thoroughly chilled.

For the whipped cream:
Combine the cream, sugar and vanilla extract in a mixing bowl. Beat with an electric hand mixer or immersion blender until the mixture holds stiff peaks. Set aside.

To assemble the tiramisu:
Have ready a rectangular serving dish (about 8" by 8" should do) or one of your choice.Mix together the warm espresso, rum extract and sugar in a shallow dish, whisking to mix well. Set aside to cool.In a large bowl, beat the mascarpone cheese with a spoon to break down the lumps and make it smooth. This will make it easier to fold. Add the prepared and chilled zabaglione and pastry cream, blending until just combined. Gently fold in the whipped cream. Set this cream mixture aside.

Now to start assembling the tiramisu.
Workings quickly, dip 12 of the ladyfingers in the sweetened espresso, about 1 second per side. They should be moist but not soggy. Immediately transfer each ladyfinger to the platter, placing them side by side in a single row. You may break a lady finger into two, if necessary, to ensure the base of your dish is completely covered.Spoon one-third of the cream mixture on top of the ladyfingers, then use a rubber spatula or spreading knife to cover the top evenly, all the way to the edges.Repeat to create 2 more layers, using 12 ladyfingers and the cream mixture for each layer. Clean any spilled cream mixture; cover carefully with plastic wrap and refrigerate the tiramisu overnight.To serve, carefully remove the plastic wrap and sprinkle the tiramisu with cocoa powder using a fine-mesh strainer or decorate as you please. Cut into individual portions and serve.

MASCARPONE CHEESE

(Source: Vera’s Recipe for Homemade Mascarpone Cheese)This recipe makes 12oz/ 340gm of mascarpone cheese

Ingredients:
474ml (approx. 500ml)/ 2 cups whipping (36 %) pasteurized (not ultra-pasteurized), preferably organic cream (between 25% to 36% cream will do)1 tablespoon fresh lemon juice
Bring 1 inch of water to a boil in a wide skillet. Reduce the heat to medium-low so the water is barely simmering. Pour the cream into a medium heat-resistant bowl, then place the bowl into the skillet. Heat the cream, stirring often, to 190 F. If you do not have a thermometer, wait until small bubbles keep trying to push up to the surface.It will take about 15 minutes of delicate heating. Add the lemon juice and continue heating the mixture, stirring gently, until the cream curdles. Do not expect the same action as you see during ricotta cheese making. All that the whipping cream will do is become thicker, like a well-done crème anglaise. It will cover a back of your wooden spoon thickly. You will see just a few clear whey streaks when you stir. Remove the bowl from the water and let cool for about 20 minutes. Meanwhile, line a sieve with four layers of dampened cheesecloth and set it over a bowl. Transfer the mixture into the lined sieve. Do not squeeze the cheese in the cheesecloth or press on its surface (be patient, it will firm up after refrigeration time). Once cooled completely, cover with plastic wrap and refrigerate (in the sieve) overnight or up to 24 hours.Vera’s notes: The first time I made mascarpone I had all doubts if it’d been cooked enough, because of its custard-like texture. Have no fear, it will firm up beautifully in the fridge, and will yet remain lusciously creamy.Keep refrigerated and use within 3 to 4 days.

LADYFINGERS/ SAVOIARDI BISCUITS(Source: Recipe from Cordon Bleu At Home)This recipe makes approximately 24 big ladyfingers or 45 small (2 1/2" to 3" long) ladyfingers.

Ingredients:
3 eggs, separated6 tablespoons /75gms granulated sugar
3/4 cup/95gms cake flour, sifted (or 3/4 cup all purpose flour + 2 tbsp corn starch)6 tablespoons /50gms confectioner's sugar,

Method:

Preheat your oven to 350 F (175 C) degrees, then lightly brush 2 baking sheets with oil or softened butter and line with parchment paper.Beat the egg whites using a hand held electric mixer until stiff peaks form. Gradually add granulate sugar and continue beating until the egg whites become stiff again, glossy and smooth.In a small bowl, beat the egg yolks lightly with a fork and fold them into the meringue, using a wooden spoon. Sift the flour over this mixture and fold gently until just mixed. It is important to fold very gently and not overdo the folding. Otherwise the batter would deflate and lose volume resulting in ladyfingers which are flat and not spongy.Fit a pastry bag with a plain tip (or just snip the end off; you could also use a Ziploc bag) and fill with the batter. Pipe the batter into 5" long and 3/4" wide strips leaving about 1" space in between the strips.Sprinkle half the confectioner's sugar over the ladyfingers and wait for 5 minutes. The sugar will pearl or look wet and glisten. Now sprinkle the remaining sugar. This helps to give the ladyfingers their characteristic crispness.
Hold the parchment paper in place with your thumb and lift one side of the baking sheet and gently tap it on the work surface to remove excess sprinkled sugar.
Bake the ladyfingers for 10 minutes, then rotate the sheets and bake for another 5 minutes or so until the puff up, turn lightly golden brown and are still soft.
Allow them to cool slightly on the sheets for about 5 minutes and then remove the ladyfingers from the baking sheet with a metal spatula while still hot, and cool on a rack.
Store them in an airtight container till required. They should keep for 2 to 3 weeks.

Tuesday, January 26, 2010

Gluten-Free Graham Wafers and Nanaimo Bars


The January 2010 Daring Bakers’ challenge was hosted by Lauren of Celiac Teen. Lauren chose Gluten-Free Graham Wafers and Nanaimo Bars as the challenge for the month. The sources she based her recipe on are 101 Cookbooks and http://www.nanaimo.ca/.

Graham Cracker Recipe
2 1/2 cups plus 2 tablespoons unbleached pastry flour or unbleached all-purpose flour1 cup dark brown sugar, lightly packed1 teaspoon baking soda3/4 teaspoon kosher salt7 tablespoons (3 1/2 ounces) unsalted butter, cut into 1-inch cubes and frozen1/3 cup mild-flavored honey, such as clover5 tablespoons whole milk2 tablespoons pure vanilla extract
For the topping:
3 tablespoons granulated sugar1 teaspoon ground cinnamon
In the bowl of a food processor fitted with the steel blade or in the bowl of an electric mixer fitted with the paddle attachment, combine the flour, brown sugar, baking soda, and salt. Pulse or mix on low to incorporate. Add the butter and pulse on and off on and off, or mix on low, until the mixture is the consistency of a coarse meal.
In a small bowl, whisk together the honey, milk, and vanilla extract. Add to the flour mixture and pulse on and off a few times or mix on low until the dough barely comes together. It will be very soft and sticky.
Turn the dough out onto a lightly floured work surface and pat the dough into a rectangle about 1 inch thick. Wrap in plastic and chill until firm, about 2 hours or overnight.
To prepare the topping: In a small bowl, combine the sugar and cinnamon, and set aside.
Divide the dough in half and return one half to the refrigerator. Sift an even layer of flour onto the work surface and roll the dough into a long rectangle about 1/8 inch thick. The dough will be sticky, so flour as necessary. Trim the edges of the rectangle to 4 inches wide. Working with the shorter side of the rectangle parallel to the work surface, cut the strip every 4 1/2 inches to make 4 crackers. Gather the scraps together and set aside. Place the crackers on one or two parchment-lined baking sheets and sprinkle with the topping. Chill until firm, about 30 to 45 minutes. Repeat with the second batch of dough.
Adjust the oven rack to the upper and lower positions and preheat the oven to 350 degrees.
Gather the scraps together into a ball, chill until firm, and reroll. Dust the surface with more flour and roll out the dough to get about two or three more crackers.
Mark a vertical line down the middle of each cracker, being careful not to cut through the dough. Using a toothpick or skewer, prick the dough to form two dotted rows about 1/2 inch for each side of the dividing line.
Bake for 25 minutes, until browned and slightly firm to the tough, rotating the sheets halfway through to ensure even baking.
Yield: 10 large crackers
Nanaimo Bar Recipe
Bottom Layer½ cup unsalted butter (European style cultured)¼ cup sugar5 tbsp. cocoa1 egg beaten1 ¼ cups graham wafer crumbs½ c. finely chopped almonds1 cup coconut
Melt first 3 ingredients in top of double boiler. Add egg and stir to cook and thicken. Remove from heat. Stir in crumbs, coconut, and nuts. Press firmly into an ungreased 8" x 8" pan.
Second Layer½ cup unsalted butter2 Tbsp. and 2 Tsp. cream2 Tbsp. vanilla custard powder2 cups icing sugar
Cream butter, cream, custard powder, and icing sugar together well. Beat until light. Spread over bottom layer.
Third Layer4 squares semi-sweet chocolate (1 oz. each)2 Tbsp. unsalted butter
Melt chocolate and butter overlow heat. Cool. Once cool, but still liquid, pour over second layer and chill in refrigerator.

Saturday, December 26, 2009

Gingerbread House


The December 2009 Daring Bakers’ challenge was brought to you by Anna of Very Small Anna and Y of Lemonpi. They chose to challenge Daring Bakers’ everywhere to bake and assemble a gingerbread house from scratch. They chose recipes from Good Housekeeping and from The Great Scandinavian Baking Book as the challenge recipes.


As a kid my favourite story was ‘Hansel and Gretel’. My Mom loved reading to us and all of us kids used to get excited when the bad little Witch put Hansel and Gretel in the Gingerbread House and all they got to eat was candy from the Gingerbread House.

So, when it was announced that our Challenge was going to be a gingerbread house, I was in high spirits. Got all the materials needed, made the templates on cardboard and here is my Gingerbread House……my first one. Tell me what you think of it …..

I must add here that my son and my husband were my ‘helpers’ and without them my house would not be standing. ;) ;).

I used ‘Y’s recipe …as the other recipe had Molasses, which I could not find even though I searched high and low.

So here is my Gingerbread house…my very first one. Please tell me what you think of it.

I first made the ‘rustic’ looking one. Then I improvised on it by adding conflakes for the roof, some candy and snowmen. So its one housebut two looks…;)………

Here is the recipe for those who want it ..

Recipe for the Gingerbread :

1 Cup butter @ room temperature
1 cup brown sugar
2 tablespoons cinnamon
4 teaspoons ground ginger
3 teaspoons ground cloves
2 teaspoons baking soda
½ cup boiling water
5 cups flour.

In a large bowl, cream the butter and sugar till well blended Add the spice powders Mix the baking soda with boiling water and add to the dough along with the flour. Mix to make a stiff dough. If needed, add more water, a tablespoon at a time. Wrap in plastic wrap and chill overnight.

Using the template cut patters for the house (Walls, roof, chimney etc). It is a good idea to have them stuck on cardboard.

Keep a waxed paper on the counter and roll your dough on it to 1/8” thickness. Keep your templates on this and cut the dough as per the templates. Transfer the waxed paper to a cookie sheet ensuring that the shape of the template is retained.

Preheat over to 180-190 deg C and bake for 12-15 minutes until the cookie dough feels firm After baking, again place the template on top of the gingerbread and trim the shapes, cutting the edges with a straight-edged knife. Leave to cool on the baking sheet

Royal Icing (Used as Cement to glue your house together, to affix the candies & for snow on the roof )

1 large egg white
3 cups powdered sugar
1 teaspoon white vinegar
1 teaspoon Almond Extract

Whip the egg white till soft peaks form. Add sugar a little by little. Add almond extract and vinegar (white). This will harden over time – is used as your glue for binding the walls together.

Fix the house together and hold each wall together till it sets….. complete the construction of the whole house this way..keeping the roof for the last.

Decorate the house with candies, icing sugar etc.

I used the ‘Templates’ from this Martha Stewart Site.
http://www.marthastewart.com/how-to/swedish-gingerbread-house

Fondant (for the snowmen )
(You will need just a quarter for the snowmen- can freeze the remaining for later use)

2 Pounds Confectioners sugar
1 tbsp unflavoured gelatin
¼ cup cold eater
½ cup light corn syrup
1 tbsp glycerin
1 tbsp. clear vanilla essence
1 tbsp white shortening.

Sift 1.5 pnds of the Confectioners sugar into a large bowl. Make a well in the center and set aside. Transfer the rest of the sugar into a sieve and set aside.

Sprinkle gelatin over cold water in a measuring cup. Stand for 2 minutes to soften. Place the bowl into a saucepan with barely simmering water until gelatin dissolves. Stir in corn syrup, glycerin and vanilla essence & reheat..do not boil. The mixture should be smooth and clear. Pour glycerin mixture into well of icing sugar and stir till combined.

Transfer the sticky fondant to a silicon mat and knead- gradually add more icing sugar – rub the vegetable shortening and knead the fondant.

Allow to rest for 24 hours before using. You will get snow-white fondant. If you need to colour the fondant – remove a bit aside and add one or two drops of colour.

Friday, November 27, 2009

Cannoli - The Italian Connection


The November 2009 Daring Bakers Challenge was chosen and hosted by Lisa Michele of Parsley, Sage, Desserts and Line Drives. She chose the Italian Pastry, Cannolo (Cannoli is plural), using the cookbooks Lidia’s Italian-American Kitchen by Lidia Matticchio Bastianich and The Sopranos Family Cookbook by Allen Rucker; recipes by Michelle Scicolone, as ingredient/direction guides. She added her own modifications/changes, so the recipe is not 100% verbatim from either book.
Cannoli are known as Italian-American pastries, although the origin of Cannoli dates back to Sicily, specifically Palermo, where it was prepared during Carnevale season, and according to lore, as a symbol of fertility. The Cannoli is a fried, tube-shaped pastry shell (usually containing wine) filled with a creamy amalgamation of sweetened ricotta cheese, chocolate, candied fruit or zest, and sometimes nuts. Although not traditional, mascarpone cheese is also widely used, and in fact, makes for an even creamier filling when substituted for part of the ricotta, or by itself. However, Cannoli can also be filled with pastry creams, mousses, whipped cream, ice cream etc. You could also add your choice of herbs, zests or spices to the dough, if desired. Marsala is the traditional wine used in Cannoli dough, but any red or white wine will work fine, as it’s not only added for flavor or color, but to relax the gluten in the dough since it can be a stiff dough to work with.
I started on my Cannoli on the reveal date itself. It was such a breeze – I think one of the easiest of the DB challenges. The shells were tasty and different. The flavour of the Cinnamon and red wine was just right. I made only half the portion given and made mini Cannoli. They were a big hit with my family and disappeared in no time. They don’t say ‘Necessity is the Mother of Invention’ for nothing. I searched high and low but just could’nt find Cannoli forms anywhere…. Not to be outdone, I found two old wooden hangers. Used a saw and I had my home-made Cannoli Tubes ready. Ta.dah !!!
The recipe below for those interested.
Equipment:Cannoli forms/tubes - optional, but recommended if making traditional shaped Cannoli. Dried cannelloni pasta tubes work just as well!Deep, heavy saucepan, enough to hold at least 2-3-inches of oil or deep fryerDeep fat frying thermometer. although the bread cube or bit of dough test will work fine.Metal tongsBrass or wire skimmer OR large slotted spoonPastry bag with large star or plain tip, but a snipped ziplock bag, butter knife or teaspoon will work fine.Cooling rackPaper bags or paper towelsPastry BrushCheeseclothSieve or fine wire mesh strainerElectric Mixer, stand or hand, optional, as mixing the filling with a spoon is fine.Food Processor or Stand Mixer – also optional, since you can make the dough by hand, although it takes more time.Rolling pin and/or Pasta roller/machinePastry or cutting boardRound cutters - The dough can also be cut into squares and rolled around the cannoli tube prior to frying. If making a stacked cannoli, any shaped cutter is fine, as well as a sharp knife.Mixing bowl and wooden spoon if mixing filling by handPlastic Wrap/ClingfilmTea towels or just cloth towels
CANNOLI SHELLS2 cups (250 grams/8.82 ounces) all-purpose flour2 tablespoons(28 grams/1 ounce) sugar1 teaspoon (5 grams/0.06 ounces) unsweetened baking cocoa powder1/2 teaspoon (1.15 grams/0.04 ounces) ground cinnamon1/2 teaspoon (approx. 3 grams/0.11 ounces) salt3 tablespoons (42 grams/1.5 ounces) vegetable or olive oil1 teaspoon (5 grams/0.18 ounces) white wine vinegarApproximately 1/2 cup (approx. 59 grams/approx. 4 fluid ounces/approx. 125 ml) sweet Marsala or any white or red wine you have on hand1 large egg, separated (you will need the egg white but not the yolk)Vegetable or any neutral oil for frying – about 2 quarts (8 cups/approx. 2 litres)1/2 cup (approx. 62 grams/2 ounces) toasted, chopped pistachio nuts, mini chocolate chips/grated chocolate and/or candied or plain zests, fruits etc.. for garnishConfectioners' sugar
Note - If you want a chocolate cannoli dough, substitute a few tablespoons of the flour (about 25%) with a few tablespoons of dark, unsweetened cocoa powder (Dutch process) and a little more wine until you have a workable dough (Thanks to Audax).
CANNOLI FILLING2 lbs (approx. 3.5 cups/approx. 1 kg/32 ounces) ricotta cheese, drained1 2/3 cups cup (160 grams/6 ounces) confectioner’s sugar, (more or less, depending on how sweet you want it), sifted1/2 teaspoon (1.15 grams/0.04 ounces) ground cinnamon1 teaspoon (4 grams/0.15 ounces) pure vanilla extract or the beans from one vanilla bean3 tablespoons (approx. 28 grams/approx. 1 ounce) finely chopped good quality chocolate of your choice2 tablespoons (12 grams/0.42 ounces) of finely chopped, candied orange peel, or the grated zest of one small to medium orange3 tablespoons (23 grams/0.81 ounce) toasted, finely chopped pistachios
Note - If you want chocolate ricotta filling, add a few tablespoons of dark, unsweetened cocoa powder to the above recipe, and thin it out with a few drops of warm water if too thick to pipe.
DIRECTIONS FOR SHELLS:1. In the bowl of an electric stand mixer or food processor, combine the flour, sugar, cocoa, cinnamon, and salt. Stir in the oil, vinegar, and enough of the wine to make a soft dough. Turn the dough out onto a lightly floured surface and knead until smooth and well blended, about 2 minutes. Shape the dough into a ball. Cover with plastic wrap and let rest in the fridge from 2 hours to overnight.
2 Cut the dough into two pieces. Keep the remaining dough covered while you work. Lightly flour a large cutting or pastry board and roll the dough until super thin, about 1/16 to 1/8” thick (An area of about 13 inches by 18 inches should give you that). Cut out 3 to 5-inch circles (3-inch – small/medium; 4-inch – medium/large; 5-inch;- large. Your choice). Roll the cut out circle into an oval, rolling it larger and thinner if it’s shrunk a little.
3 Oil the outside of the cannoli tubes (You only have to do this once, as the oil from the deep fry will keep them well, uhh, oiled..lol). Roll a dough oval from the long side (If square, position like a diamond, and place tube/form on the corner closest to you, then roll) around each tube/form and dab a little egg white on the dough where the edges overlap. (Avoid getting egg white on the tube, or the pastry will stick to it.) Press well to seal. Set aside to let the egg white seal dry a little.
4. In a deep heavy saucepan, pour enough oil to reach a depth of 3 inches, or if using an electric deep-fryer, follow the manufacturer's directions. Heat the oil to 375°F (190 °C) on a deep fry thermometer, or until a small piece of the dough or bread cube placed in the oil sizzles and browns in 1 minute. Have ready a tray or sheet pan lined with paper towels or paper bags.
. Carefully lower a few of the cannoli tubes into the hot oil. Do not crowd the pan. Fry the shells until golden, about 2 minutes, turning them so that they brown evenly.
8. Lift a cannoli tube with a wire skimmer or large slotted spoon, out of the oil. Using tongs, grasp the cannoli tube at one end. Very carefully remove the cannoli tube with the open sides straight up and down so that the oil flows back into the pan. Place the tube on paper towels or bags to drain. Repeat with the remaining tubes. While they are still hot, grasp the tubes with a potholder and pull the cannoli shells off the tubes with a pair of tongs, or with your hand protected by an oven mitt or towel. Let the shells cool completely on the paper towels. Place shells on cooling rack until ready to fill.
9. Repeat making and frying the shells with the remaining dough. If you are reusing the cannoli tubes, let them cool before wrapping them in the dough.
DIRECTIONS FOR FILLING:1. Line a strainer with cheesecloth. Place the ricotta in the strainer over a bowl, and cover with plastic wrap and a towel. Weight it down with a heavy can, and let the ricotta drain in the refrigerator for several hours to overnight.
2. In a bowl with electric mixer, beat ricotta until smooth and creamy. Beat in confectioner’s sugar, cinnamon, vanilla and blend until smooth. Transfer to another bowl and stir in chocolate, zest and nuts. Chill until firm.(The filling can be made up to 24 hours prior to filling the shells. Just cover and keep refrigerated).
ASSEMBLE THE CANNOLI:1. When ready to serve..fill a pastry bag fitted with a 1/2-inch plain or star tip, or a ziplock bag, with the ricotta cream. If using a ziplock bag, cut about 1/2 inch off one corner. Insert the tip in the cannoli shell and squeeze gently until the shell is half filled. Turn the shell and fill the other side. You can also use a teaspoon to do this, although it’s messier and will take longer.
2. Press or dip cannoli in chopped pistachios, grated chocolate/mini chocolate chips, candied fruit or zest into the cream at each end. Dust with confectioner’s sugar and/or drizzles of melted chocolate if desired.

Tuesday, October 27, 2009

The Macaron Saga .......


The 2009 October Daring Bakers’ challenge was brought to us by Ami S. She chose macarons from Claudia Fleming’s The Last Course: The Desserts of Gramercy Tavern as the challenge recipe.
Dating back to the 18th century, the Macaron is a traditional French pastry, made of egg-whites, almond powder, icing sugar and sugar. This sweet pastry came out of the French courts’ baker’s oven as round meringue-like domes with a flat base.
Macarons, also anglicized “macaroons”, are not to be confused with a similar pastry also called ‘macaroons’. Macarons are sandwich-like pastries made with two thin cookies and a cream or ganache between the cookies. Macaroons are dense cookies made either with coconut or with a coarse almond paste.
The Macaron’s origin isn’t clear, but it may have been brought to France from Italy as early as 1533 by Catherine di Medici and her pastry chefs. Macarons gained fame in 1792 when two Carmelite nuns seeking asylum in Nancy during the French Revolution baked and sold Macarons in order to support themselves, thus becoming known as “the Macaron sisters.” The Macarons they made were a simple combination of ground almonds, egg whites, and sugar. No special flavors and no filling.
It wasn’t until the 1900s that Pierre Desfontaines of Parisian pastry shop and café Ladurée decided to take two cookies and fill them with ganache. Today Ladurée continues to be one of the first stops for macaron-crazed fans in Paris. No longer a humble almond cookie, the macaron turned into a versatilely flavored treat with a thin, light crust briefly giving way to a layer of moist almond meringue following by a center of silky smooth filling.
Oh OMG! This was my first reaction when I read about the challenge for this month’s daring bakers. For ages, I have been drooling over of this pretty French dessert. I have been admiring at all those lovely Macarons on Tartlettes blog and everytime thinking “I must try this. I’m usually game for challenges of any sort be it baking or life in general, but the stories of disasters with this temperamental dessert has always made me take a step back.
I tried it not once, not twice but thrice and the “Feet” avoided me like the plague. I aged the egg whites, sifted the almond flour, rested the piped batter for one hour, had the oven at the right temperature, lowered the temperature after 5 minutes and still no luck. Was waiting anxiously for the feet to appear........ but my Macarons were retarded...no feeeeeeet. The third time they faintly resembled ‘Macarons’…..but by that time my almond meal was over and the clock was ticking as ‘Reveal Date’ was already here. So here I am with my ‘Feetless Macarons’…… and with a vow that one day soon I’m gonna conquer Da Macaron…….by its feet …..
I made Macarons with a Chai Latte flavour as a friend of mine had dumped a packet of Bondi Chai Latte- Vanilla flavour, on me a few weeks ago……. They tasted very yummy and quickly dissappeared from the platter.

The following is the recipe that we had to follow.
IngredientsConfectioners’ (Icing) sugar: 2 ¼ cups (225 g, 8 oz.)Almond flour: 2 cups (190 g, 6.7 oz.)Granulated sugar: 2 tablespoons (25 g , .88 oz.)Egg whites: 5 (Have at room temperature)
(I added 2 teaspoons of chai latte powder to the batter)
Directions:
1. Preheat the oven to 200°F (93°C). Combine the confectioners’ sugar and almond flour in a medium bowl. If grinding your own nuts, combine nuts and a cup of confectioners’ sugar in the bowl of a food processor and grind until nuts are very fine and powdery.2. Beat the egg whites in the clean dry bowl of a stand mixer until they hold soft peaks. Slowly add the granulated sugar and beat until the mixture holds stiff peaks.3. Sift a third of the almond flour mixture into the meringue and fold gently to combine. If you are planning on adding zest or other flavorings to the batter, now is the time. Sift in the remaining almond flour in two batches. Be gentle! Don’t overfold, but fully incorporate your ingredients.4. Spoon the mixture into a pastry bag fitted with a plain half-inch tip (Ateco #806). You can also use a Ziploc bag with a corner cut off. It’s easiest to fill your bag if you stand it up in a tall glass and fold the top down before spooning in the batter.5. Pipe one-inch-sized (2.5 cm) mounds of batter onto baking sheets lined with nonstick liners (or parchment paper).6. Bake the macaroon for 5 minutes. Remove the pan from the oven and raise the temperature to 375°F (190°C). Once the oven is up to temperature, put the pans back in the oven and bake for an additional 7 to 8 minutes, or lightly colored.7. Cool on a rack before filling.
We were given the freedom to choose the flavour of the macarons and the filling. We could also use other nuts apart from almonds.

I used Nutella for the filling.

Saturday, September 26, 2009

Vols-au-Vent - Savory n Sweet


The September 2009 Daring Bakers' challenge was hosted by Steph of A Whisk and a Spoon. She chose the French treat, Vols-au-Vent based on the Puff Pastry recipe by Michel Richard from the cookbook Baking With Julia by Dorie Greenspan.

This has been a really amazing challenge, something which I truly enjoyed doing. I had been using puff-pastry before; and I had done the Danish Braid earlier, but I really had an adrenalin rush this time…I wonder why ? Could be because we were doing puff-pastry from scratch.....The results were great and I charmed a few of my guests. This is one recipe which goes to my cook-book for keeps.

I made a savory/spicy one with sausages, cilantro and a 2nd sweet one with lemon curd custard and fruits. They are nowhere near the awesome stuff that Tartlette churns out……… but can get passing marks.

Here is the recipe for those interested.

Equipment:
food processor (will make mixing dough easy, but I imagine this can be done by hand as well)
-rolling pin-pastry brush-metal bench scraper (optional, but recommended)
-plastic wrap-baking sheet-parchment paper
-silicone baking mat (optional, but recommended)
-set of round cutters (optional, but recommended)
-sharp chef’s knife-fork-oven-cooling rack

- Prep Times:-about 4-5 hours to prepare the puff pastry dough (much of this time is inactive, while you wait for the dough to chill between turns…it can be stretched out over an even longer period of time if that better suits your schedule)-about 1.5 hours to shape, chill and bake the vols-au-vent after your puff pastry dough is complete

Forming and Baking the Vols-au-Vent
Yield: 1/3 of the puff pastry recipe below will yield about 8-10 1.5” vols-au-vent or 4 4” vols-au-vent
In addition to the equipment listed above, you will need:-
well-chilled puff pastry dough (recipe below)
-egg wash (1 egg or yolk beaten with a small amount of water)
-your filling of choice
Line a baking sheet with parchment and set aside.
Using a knife or metal bench scraper, divided your chilled puff pastry dough into three equal pieces. Work with one piece of the dough, and leave the rest wrapped and chilled. (If you are looking to make more vols-au-vent than the yield stated above, you can roll and cut the remaining two pieces of dough as well…if not, then leave refrigerated for the time being or prepare it for longer-term freezer storage.

On a lightly floured surface, roll the piece of dough into a rectangle about 1/8 to 1/4-inch (3-6 mm) thick. Transfer it to the baking sheet and refrigerate for about 10 minutes before proceeding with the cutting.
(This assumes you will be using round cutters, but if you do not have them, it is possible to cut square vols-au-vents using a sharp chef’s knife.) For smaller, hors d'oeuvre sized vols-au-vent, use a 1.5” round cutter to cut out 8-10 circles. For larger sized vols-au-vent, fit for a main course or dessert, use a 4” cutter to cut out about 4 circles. Make clean, sharp cuts and try not to twist your cutters back and forth or drag your knife through the dough. Half of these rounds will be for the bases, and the other half will be for the sides. (Save any scrap by stacking—not wadding up—the pieces…they can be re-rolled and used if you need extra dough. If you do need to re-roll scrap to get enough disks, be sure to use any rounds cut from it for the bases, not the ring-shaped sides.)
Using a ¾-inch cutter for small vols-au-vent, or a 2- to 2.5-inch round cutter for large, cut centers from half of the rounds to make rings. These rings will become the sides of the vols-au-vent, while the solid disks will be the bottoms. You can either save the center cut-outs to bake off as little “caps” for you vols-au-vent, or put them in the scrap pile.

Dock the solid bottom rounds with a fork (prick them lightly, making sure not to go all the way through the pastry) and lightly brush them with egg wash. Place the rings directly on top of the bottom rounds and very lightly press them to adhere. Brush the top rings lightly with egg wash, trying not to drip any down the sides (which may inhibit rise). If you are using the little “caps,” dock and egg wash them as well.

Refrigerate the assembled vols-au-vent on the lined baking sheet while you pre-heat the oven to 400ºF (200ºC). (You could also cover and refrigerate them for a few hours at this point.)
Once the oven is heated, remove the sheet from the refrigerator and place a silicon baking mat (preferred because of its weight) or another sheet of parchment over top of the shells. This will help them rise evenly. Bake the shells until they have risen and begin to brown, about 10-15 minutes depending on their size. Reduce the oven temperature to 350ºF (180ºC), and remove the silicon mat or parchment sheet from the top of the vols-au-vent. If the centers have risen up inside the vols-au-vent, you can gently press them down. Continue baking (with no sheet on top) until the layers are golden, about 15-20 minutes more. (If you are baking the center “caps” they will likely be finished well ahead of the shells, so keep an eye on them and remove them from the oven when browned.)

Remove to a rack to cool. Cool to room temperature for cold fillings or to warm for hot fillings.
Fill and serve.